Maximize
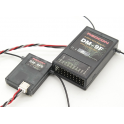
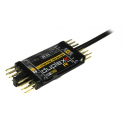
FRSKY TFRSP 2.4Ghz 10CH CCPM + RSSI
- Remove this product from my favorite's list.
- Add this product to my list of favorites.
 Maximize

Receiver output CPPM, which means that for a single signal cable passes the information of all channels , widely used to connect a controller pair multicoptero eg Lite Naza , Naza V.2 , WKM , ... one cable to the receiver.
It can also be used for applications FPV / UAV aircraft, to reduce wiring and connection errors eviar . It is also widely used for autopilot systems and systems for UAVs , facilitates the connection
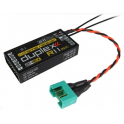
Receiver with RSSI output on the second connector. RSSI = indication of the received signal power . This signal is proportional to the intensity of the signal received from the input signal Tx . Widely used this data to use FPV / UAV aircraft. We know if the radio control signal is good and if we can Keep us more . According we move further from the base signal anger worse , the RSSI data we reach the limit we have.
This receiver 2.4GHz FASST FRSKY TFRSP supports :
Futaba: 6EX , 7C , TM -7 , TM -8, T8FG , T10C , TM -10, T10CG , T12Z , T12FG , TM -14, T14MZ , etc.
FASST 2.4G : Air Systems ( 7CH Mode / Multi Mode)
FrSky TF Modules: TF -8M, TF- 14M
Receiver Specifications ( TFRSP ) :
Voltage: .................. 3.5 to 10.0 V
Power Consumption: ............... 100 mA
Modulation : 2.4 Ghz FASST ( Technologia support futabas stations)
Resolution: ............................. 3072
Number of Channels : .................. 10
Out ...................................... RSSI
Out ...................................... CPPM
Fail Safe .................................. in all channels
Antennas ................................... 2 ( diversity)
Scope: .................................. Over 1.5 km
Dimensions : .......................... 53 x 30 x 11 mm
Weight : ..................................... 14g
manual
Warning: Servos must not be connected to Channel CPPM or the RSSI channel servos and puedenquemar calientarian .
Binding Procedure 2.1 ( Pairing )
Turn on the transmitter, connect the battery to the receiver while pressing the receiver button F / S. After the LEDROJO is off and GREEN LED is solid complete the binding process and the receiver is operating normally.
Three . Fail Safe Settings ( Safe ) :
TFRSP supports the Fail Safe function on all channels . Follow these steps to configure the Fail Safe :
1) Bind the receiver first and desactivae the fail safe mode the transmitter;
2) Set all transmitter controls to the desired position safety ;
3) Press briefly the F / S receiver GREEN LED of the receiver button flashes twice indicating that the Fail Safe has been saved successfully .
If you do not need the Fail Safe function Realize a new binding ,
Warning: Some manufacturers of transmitters utilize a Fail Safe that can interfere with the porFrSky used . Be sure to disable any configuration Fail Safe transmitter before posting positions in Fail Safe FRSKY receptor.
4 LED status :
| RED LED | GREEN LED | Mode |
| Off | On | Normal mode |
| On | On | Waiting to be bound |
| Flashing | On | Signal lost |
| On | Flashing twice | Set failsafe |